Learn the Basics of Quilling Paper
One of the benefits of paper quilling is that it is a very
affordable craft. Even if you end up
purchasing all of the special tools, it does not cost much when compared to
some other crafts. Plus, there are ways
you can spend no money at all when paper quilling! One of the ways to cut down on costs is to
cut your own paper quilling strips. I outline the pros and cons of buying paper
strips vs cutting your own. Today I am
going to focus on HOW to cut your own paper strips. There are two main ways.
Supplied Needed:
1.) scisscor
2.)tooth picker
3.)stationaryknife
4.)glue UHU
5.)cutting mat
The Basic of Quiling
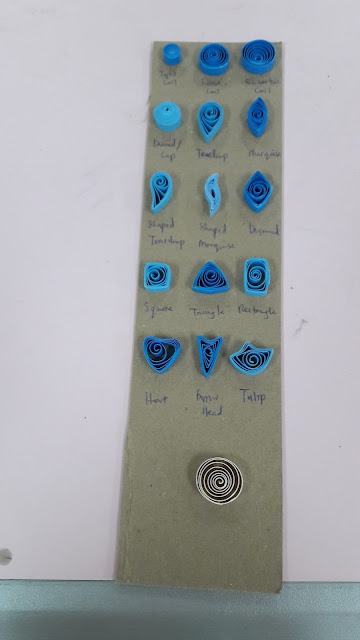
The projects in this article feature the teardrop coil, but
there are many other intriguing shapes to try — marquises, arrowheads, holly
leaves, and all sorts of beautiful scrolls, just to name a few.
Directions
When purchasing a tool there are 2 basic types: a slotted
tool and needle tool. The slotted tool is easiest to use; its only disadvantage
is that the slot leaves a tiny crimp in the center of the coil. If this is
bothersome, purchase an ultra-fine slotted tool or try a needle tool. The
needle tool is a bit more difficult to master, but the reward will be a coil
with a perfectly round center.
To roll a coil with a
slotted tool: Slide the very end of a strip into the slot, and turn the tool
with one hand while evenly guiding the strip with the other.
To roll a coil with a needle tool: Dampen fingers and curve
one end of a strip across the needle. Roll the strip around the needle with the
thumb and index finger of whichever hand feels most comfortable, applying even,
firm pressure, while holding the handle of the tool with the other hand. Be
sure to roll the paper, not the tool.
Whether using a slotted tool or needle tool, when the strip
is fully rolled, allow the coil to relax, slide it off the tool, and glue the
end. Use only a very small amount of glue, applying it with the tip of a T-pin,
paper piercing tool, or toothpick. Hold the end in place for a few moments
while the glue dries. This is called a loose coil, and it’s the basic shape
from which many other shapes are made.
HOW TO MAKE QUILING PAPER
- Step 1: Make 4 teardrop. Roll a 12″ loose coil. Press the coil slightly between your fingers, and, if necessary, use a pin to arrange the inner coils so they are evenly spaced.
- Step 2: Make 2 hearts. Place 2 teardrops side by side on the work board to create a heart shape, positioning them in opposite directions so the inner coils appear to meet. Apply glue at the join spot.
- Step 3: Fill a jar with your favorite treat and tie a ribbon around it.
- Step 4: Cut 2 white, 1″ cardstock squares and glue a heart on each.
Tip: When gluing a
quilled object on a background, spread a shallow puddle of glue on a plastic
container lid or a sheet of waxed paper. Hold the quilling with tweezers and
dip its underside gently in glue. Place directly on the background.
- Step 5: Attach 1 square to each ribbon tail with a glue dot.
This is the result of quilling paper made by my group .
Picture 1
Picture 2
Picture 3
Post by: Octovia Tiong Saiw Fang


No comments:
Post a Comment